Cultivating Inner Resilience: A 50-Minute Yin Yoga Practice Inspired by Ganesha Cultivating Inner Resilience: A 50-Minute Yin Yoga Practice Inspired by Ganesha
- Katy Charoensatit
- Jun 6
- 8 min read

1. Sukasana (Easy Pose / Seated Center)
Sukasana is more than just sitting cross-legged; it is the physical foundation for establishing a steady, calm mind.
How to Set It Up: Sit on the leading edge of one of your folded blankets or towels. This tilts your pelvis slightly forward, naturally restoring the organic curve of your lower spine and preventing your lower back from rounding.
Physical Alignment: Cross your shins and let your knees drop toward the floor. If your knees are high in the air or feel "pinchy," slide your feet further out in front of you to open up the angle of the joints.
The Energy: Roll your shoulders up to your ears and let them slide down your back. Imagine a golden thread pulling the back corner of your crown toward the sky, lengthening your neck while keeping your jaw and throat completely soft.
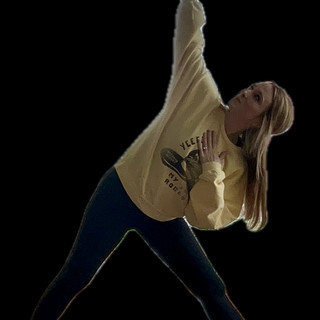
2. Ganesh Mudra
Named after the deity Ganesha, this hand gesture acts as a physical metaphor for pulling through resistance and reclaiming your power.
Step-by-Step:
1. Bring your left hand in front of your chest, about six inches away from your heart space, with your palm facing straight out toward the world (thumb pointing down).
2. Bring your right hand up to meet it, palm facing your chest (thumb pointing up).
3. Claw your fingers together, locking them like hooks.
The Action: On an exhalation, vigorously but mindfully pull your elbows in opposite directions without letting your fingers slip apart, creating a gentle pull. Feel your chest, upper back, and shoulders engage.
The Release: On your inhalation, maintain the grip but soften the muscular tension. Repeat this for several breath cycles, using the physical resistance to ground your focus inward.
3. Tip: Flex Your Left Toes Back
In Yin and restorative practices, a micro-adjustment in the foot can completely shift where a stretch travels along the lines of connective tissue (fascia).
Why It Matters: When you allow the foot to flop forward or remain passive, the stretch stays localized primarily in the belly of the hamstring muscle.
The Anatomy: By actively flexing your toes back toward your shin (dorsiflexion), you engage and lengthen the superficial back line of fascia. This anchors the stretch all the way from the sole of your foot, through the Achilles tendon, up into the calf muscle, and deeply behind the knee joint where tightness often gets trapped.
4. Shoelace Pose
This is a profound outer-hip opener that targets the gluteus medius, piriformis, and deep lateral rotators.
How to Enter: From all fours, slide your right knee forward and cross it directly over your left thigh, stacking the knees. Step your feet out wide to the edges of your mat, then slowly guide your hips backward to sit down between your heels.
Modifying with Props: If your buttocks do not comfortably rest on the floor, or if your top knee is floating painfully high, sit on your rolled towel or block. Raising the pelvis reduces the rotational angle required by the hip sockets.
The Yin Approach: Once you find your edge, let your feet go heavy. Allow the weight of your torso to sink slightly forward into gravity, holding the shape in stillness to target the dense connective tissues surrounding the pelvis.
5. Eagle Arms
A deep therapeutic release for the rhomboids and trapezius muscles of the upper back, which often carry stress and tension.
Step-by-Step:
1. Extend both arms out wide in front of you, parallel to the floor.
2. Cross your right arm underneath your left, wrapping at the elbows.
3. If accessible, wrap your forearms a second time and press your palms together. (If this is too tight, simply cross your elbows and press the backs of your hands together, or hug opposite shoulders).
The Action: Press your elbows downward away from your chin while simultaneously reaching your fingertips forward and up. To deepen the stretch between your shoulder blades, gently drop your chin toward your throat and round your upper back by a few inches.
6. Low Lunge
A foundational posture for opening the hip flexors (psoas and iliacus muscles), which spend most of our modern days shortened and compressed by sitting.
Safe Alignment: Step your front foot far enough forward so that when you sink your hips down and in, your knee stays directly over your heel—never pushing past the toes. This alignment ensures the weight distribution is absorbed by the large muscles of the leg rather than stressing the patellar tendon.
The Release: Allow your back hip to melt forward and down. Keep your hands on the floor or on blocks to support your body weight, allowing you to completely relax the target area across the front of your back thigh.
7. Downward Facing Dog
A classic inversion that stretches the entire posterior chain of the body while building mild upper-body stability.
The Setup: Spread your fingers wide and press firmly through your palms, particularly the knuckles of your index fingers and thumbs. Tuck your toes and lift your hips up and back.
Physical Mechanics: Focus less on getting your legs completely straight or your heels to the floor, and focus more on pushing the floor away to lengthen your spine. Draw your sit bones up toward the ceiling and let your head hang heavy between your upper arms to decompress the neck.
8. Supported Side Plank
A lateral stabilization posture that engages the obliques, quadratus lumborum, and outer hip muscles without overloading the shoulder joint.
Step-by-Step:
1. Prop yourself up on your bottom forearm, keeping your elbow directly beneath your shoulder socket to protect the joint rotator cuff.
2. Step your top foot flat onto the floor right in front of your waist, pointing the toes forward like a kickstand.
The Action: Press down through your forearm and your front foot to lift your bottom hip away from the mat. Keep your lower belly hugging tight toward your spine to support your pelvis from the inside out.
9. "Untied Shoelace"
A creative, accessible variation of a seated twist that strips away the strict alignment requirements of traditional poses to prioritize pure relaxation.
The Shape: Instead of tightly binding and stacking the legs as we do in classic Shoelace, you let the legs fall open loosely at comfortable, asymmetric angles.
The Feel: Reaching your top hand down toward your bottom foot creates a gentle, spiral twist through the spine and lateral waist. Because it is "untied," there is no forcing or pulling; you simply lay your body weight down into the twist and let gravity open the outer hips and side torso.
10. Half Frog Pose
A deeply grounding, asymmetrical prone posture that targets the inner groin, adductors, and hip rotators.
Step-by-Step: Lying completely flat on your stomach, slide one knee out to your side, lining it up evenly with your hip. Flex your ankle and bend your knee to a 90-degree angle, mimicking the leg of a jumping frog.
The Action: Turn your head to the side and rest it flat on your hands. There is no active muscular engagement here; simply let the inner thigh and groin sink directly down into the earth with every heavy exhalation.
11. Dead Bug Toe Taps
A low-impact, highly effective core stabilization exercise that targets the deep transverse abdominis—the body's natural internal corset.
The Setup: Lie on your back and lift your legs so your knees are bent at a 90-degree angle directly over your hips, shins parallel to the ceiling. Glue your lower back down into the mat so there is zero space between your spine and the floor.
The Movement: Keeping the 90-degree bend in your knee exactly as it is, slowly hinge from your hip socket to lower your right tiptoe down to tap the floor.
The Key: The movement must be slow. Use your deep lower core to pull the leg back up to center without letting your lower back arch or lift off the mat. Alternate sides mindfully.
12. Figure Four Stretch
A universally accessible supine hip opener that offers all the deep glute and outer-hip benefits of Pigeon Pose without putting any stressful twisting pressure on the knee joints.
Step-by-Step: Lie flat on your back with your knees bent and feet flat on the floor. Cross your right ankle over your left thigh, just below the knee, creating a shape like the number "4."
The Action: Reach your hands through the space you’ve created to loop around the back of your left thigh. Gently draw your left leg in toward your chest while simultaneously using your internal hip muscles to nudge your right knee forward and away from you. Keep your shoulders flat and relaxed against the mat.
13. Reclined Spinal Twist
A classic cooling-down posture that neutralizes the spine, releases the lower back, and stimulates the digestive system.
Step-by-Step: Keeping your legs in the crossed Figure Four shape, slowly let your legs fall as a single unit all the way over to the left until the sole of your right foot plants flat onto the floor (or onto a blanket).
The Alignment: Extend your right arm out to the side like a wing and turn your gaze over your right shoulder. Work to keep both shoulder blades pinned flat against the earth, letting the twist happen organically through your middle and lower back.
14. Bridge Pose
An active backbend that strengthens the entire posterior chain (glutes, hamstrings, and spinal erectors) while opening up the chest and front body.
Step-by-Step: Lie on your back with your knees bent, feet flat on the floor hip-width apart, and your heels pulled close enough to your body that your fingertips can just graze them.
The Action: Press down firmly through all four corners of your feet and lift your hips up toward the ceiling. Roll your shoulders slightly underneath you to lift your chest toward your chin. Keep your inner thighs pulling toward one another as if squeezing an invisible beach ball to keep your knees pointing straight forward.
15. IT Band and Outer Ankle
A targeted stretch for the lateral side of the leg, reaching areas that are notoriously difficult to access with standard yoga poses.
The Anatomy: The Iliotibial (IT) band is a thick band of fibrous connective tissue running down the outside of your thigh.
How to Access It: While lying on your back with your leg raised, guide the leg across the midline of your body by just a few inches. By using your opposite hand to grab the pinky-toe side of the foot and rotating your toes downward toward the floor, you create a profound fascial stretch that runs from your outer hip, down the side of your leg, and directly into the lateral tendons of your outer ankle.
16. Happy Baby Pose
A deep spinal release and hip opener that mimics the natural, uninhibited mobility of an infant.
Step-by-Step: Draw your knees down toward your chest, then separate them wide toward your armpits. Lift your feet up so the soles are facing flat toward the ceiling, keeping your shins completely vertical.
The Grip: Reach up and hold onto the outer edges of your feet, your ankles, or behind your knees.
The Action: Gently pull down with your hands to draw your knees closer to the earth while simultaneously pressing your tailbone flat down into the mat. You can remain completely still or gently rock side-to-side to give your lower back a soothing massage.
17. Savasana
The final resting state of any yoga practice—often considered the most important posture of all.
The Purpose: Savasana is not just a break; it is the integration phase. It allows your nervous system to down-regulate from an active state into the parasympathetic nervous system ("rest and digest"), hardwiring the physical benefits of the practice into your body.
How to Rest: Lie flat on your back. Separate your feet wide and let your toes roll outward. Place your arms a few inches away from your body with your palms facing up in a gesture of receiving. Close your eyes, let go of all controlled breathing, and allow your entire physical body to feel completely heavy, supported by the earth.


Comments